|
|
|
|
|
| Cross
Shape Frame in the Stile of Baroque, Beginning of 18th
Century
|
| Introduction |
|
|
Dimensions:
|
|
| 118cm
in height, 88cm in width, 7 cm on the thickest part |
|
| Final
facing: |
|
| Parcel
water silvered, parcel water gilded |
|
| Type
of treatment:
|
|
| Restoration |
|
| Storage
and display: |
|
| Memorial
museum collection |
|
|
|
|
|
|
|
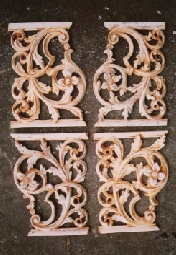
Condition
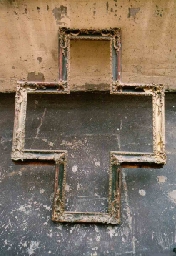
The object
arrived in studio separated from the crown and side
elements. The body of the frame (fig.1.) was cowed with
thick layer of read and green pigment, oxidized bronze
powder emulsion, and embedded with surface dirt. The
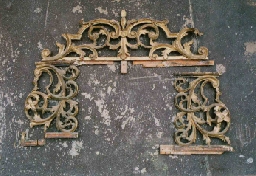
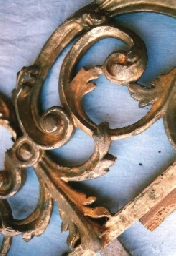
crown and side elements (fig.2.) were also cowered with
oxidized bronze powder emulsion and embedded with surface
dirt.
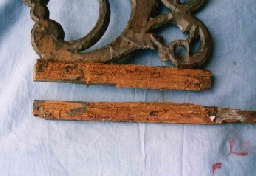
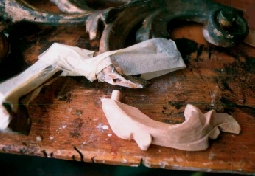
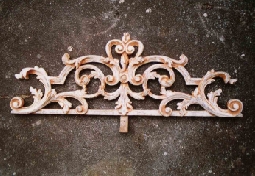
Object was inoculated, and already damaged. The starting
places of inoculation were, fortunately, elements that
were used to hold crown and side elements (fig.3.),
made of pinewood and they were completely destroyed.
Inoculation progressed on the nearest parts of frame
and crown end side elements, causing minor damages,
except on the down side of the frame.
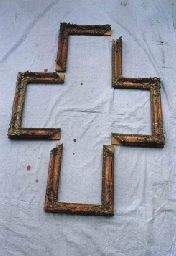
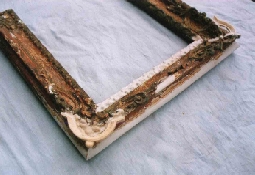
After small pressure applied on frame joints, they collapsed
(fig.4.). They were adhered with very thick layer of
bone glue.
Very delicate structure of crown and side elements was
cracked. Only two of four side elements were present.
Parts of ornaments on the all parts of object missed.
Technical
Analysis
Prior to
restoration work the following analysis were performed:
Analysis
of Materials and Techniques Involved
The body
of frame was made of Pinewood (Pinus nigra). Crown,
and side elements were made of Ashwood (Fraxinus sp.).
Frame ornaments wear made of Ashwood (Fraxinus sp.)
by wood-carving and then adhered on frame. Crown and
side elements were made by wood-carving too. All surfaces
were covered with traditional gesso approximately 2mm
thick, calcium carbonate powder and organic adhesive
probable Fish-eye glue), and then with layer of ocher
bole. Surface of frame was silvered and gilded by water
gilding technique. Silvered areas were burnished but
gilded ornaments were left non-burnished. Surfaces of
crown and side elements were gilded also by water gilding
technique. Some parts of ornaments were left non-burnished
too (fig.5. & fig.6.).
Identification
of Cowers on the All Parts of the Object
Surface
of frame was cowered with layer of pigment in form of
powder, mixed with inorganic binder. Side parts of frame
were cowered with layer of bronze powder mixed with
inorganic binder. Same bronze powder mixture was applied
on crown and side elements (fig1. & fig.2.).
|
|
|
|
|
|
 |
|
|
 |
|
|
|
|
fig.2.
click on to zoom |
|
|
|
|
|
|
|
 |
|
|
fig.1.
click on to zoom |
|
|
|
|
|
|
|
|
|
fig.3.
click on to zoom |
|
|
|
| Choice
of Treatment
Treatment
on this object was performed in two phases:
Phase
I: Pest Elimination Procedure and Choice of
Cleaning Treatment
Pest
Elimination Procedure
Due to possibility
of active inoculation, fumigation procedure was applied.
Object was exposed to carbon de sulfide (CS2) for 12
ours.
Selection
of Solvents for Cower
Solvent
test was performed with admixture which was already
used in previous projects with very satisfying results.
It was the admixture of methylen chloride, methanol,
cellulose powder and paraffin oil. Evaporation time,
due to presence of cellulose and paraffin was appreciably
reduced, concentrating the reaction on cower. Admixture
was applied on samples taken from all parts of object
and after approximately 20 minutes of exposure, resulted
in complete dissolution of pigment cower substance and
bronze powder substance but only on the areas were surface
was burnished. On the areas where surface was not burnished,
dissolution of cower was partial. Thin part of cower
was strongly attached, on microscopically rough surface.
It was not possible to remove it by the help of solvent
due to fact that particles of bronze powder in that
case were not been attached on surface by means of inorganic
binder.
After scaning and zooming, it was determined that particles
of oxidized bronze powder were blended with particles
of gold and bole. Only possible way to remove it was
mechanical one but in that case, structure of object
would be endangered. Consequences of that procedure
would be only further damaging of object so it was decided
not to proceed with mechanical cleaning.
Cleaning
Process
Adopted
solvent was gradually applied and after 20 minutes dissolved
cower substance was rinsed with nitro-thinner (1). Object
was left for few ours to dray. Condition after cleaning:
fig.4. , fig.5. & fig.6..
|
|
|
|
 |
|
 |
|
 |
|
|
fig.4.
click on to zoom |
|
fig.5.
click on to zoom |
|
fig.6.
click on to zoom
|
|
|
|
|
|
|
|
|
|
|
| Phase
II: Choice of Restoration Treatments
Selection
of the Materials and Procedures for Consolidation and
Recovering of Areas Damaged by Pests
Due to good
experience with admixture tested on all sorts of cracks
in past projects, it was tested for filling of areas
damaged by pests. Admixture was made of powdered gypsum
(CaSo4), kaolin and PVAC resin. Area was mechanically
cleaned of cutting dust and moistened with 15% ethyl
alcohol. Admixture was applied in few layers. Sample
was left to dray for 12 hours. Result was very firm,
consolidating backfill.
Selection
of the Materials and Procedures for Consolidation and
Recovering of Original Gesso
In order
to consolidate the cracks in original gesso, and make
solid ground for new gesso the 'contact ground' was
tested. Request was to obtain surface solid enough to
resist pressure during the burnishing of gold and silver
and porous to except new gesso. The ground was composed
of calcium carbonate, in form of fine powder - Bologna
chock, zinc oxide powder and PVAC resin. By the and
of mixing 90% Izo propil alcohol was added to improve
leaving of captured air. To make it applicable with
brush admixture was diluted with distilled water. Surface
was coated 3 times with time delay of 15 minutes to
provide solidification time for each layer. Sample was
left to dray for 12 hours. The result was solid but
porous surface, enough resistible on pressure preventing
the original gesso from delaminating.
Restoration
Process
Cracks in
crown and side ornaments were consolidated by inlaying
veneer peaces. Sides of cracks were mechanically flattened
and then peaces of veneer were inlayed and adhered with
aliphatic resin glue (2).
Veneer peaces and aliphatic resin glue (2) were also
used to fill gap between mortise and tenor in rejoining
process of frame structure. Gapes appeared after removing
thick layer of bone glue. Bone glue was melted with
beam of water steam and removed mechanically.
Some missing parts of ornaments were made by woodcarving
and the other by sculpturing.
Parts of wood carved ornaments including two whole missing
side elements were carved in ashwood (Fraxinus sp.).
Parts of wood-carved ornaments were adhered with aliphatic
resin glue (2) on appropriate places. They were supported
with thin dowels specially made for each of them (fig.7.).
Smaller parts of ornaments that missed were made by
sculpturing in Model plaster (3) with addition of PVAC
resin. Support for them was made of protected copper
streak.
Missing part of inside batten on the very frame was
made of model plaster and PVAC resin, with help of silicon
mold. First, thin plate (2mm) made of ashwood was affixed
and adhered with aliphatic resin glue on the place of
missing batten and then, ornament made in mold was adhered
on it. Ornament was very thin, about 2mm in order to
correspond, adhered on wooden plate, to other parts
of the batten (fig.8.).
For recovering of the damages caused by pest, tested
admixture was applied on all damaged places in corresponding
amount. Damaged places were mechanically cleaned of
cutting dust and moistened with 15% Ethyl alcohol. Admixture
was applied in few layers with moistened spatula, till
gaining of satisfying shape. After 12 hours areas of
intervention was better shaped with help of turbine.
|
|
|
|
 |
|
 |
|
|
fig.7.
click on to zoom |
|
fig.8.
click on to zoom |
|
|
|
|
Prior to
application of the 'contact ground' whole surface of
object was cleaned whit 96% etil alcohol. The 'contact
ground' was applied in three layers as it was tested
and then it was left to dray for 2 hours. New traditional
gesso consists of technical whiting (CaCo3), zinc whiting
(Zn2O) and rabbit skin glue was applied shortly afterwards
in four layers. Every layer was left to solidificate
for 15 minutes. The ground was applied on all surfaces.
The new gesso was not applied on surfaces of batten
and corner ornaments of very frame. Gesso was not necessary
to apply on them due to fact that they would not be
burnished and additional gesso would only urge change
of delicate shape of ornament.
After 12 ours all surfaces of object were shaped with
sandpaper. In order to prepare flat and smooth surface
important for quality of water gilding. Sanded surfaces
were colored with ocher bole and sanded again with 4
grades of sandpaper. During the sending surface was
rinsed with mineral spirit.Next
12 ours object was left to dray (fig.9., fig.10. &
fig.11.).
|
|
|
|
 |
|
|
|
 |
|
|
|
 |
|
|
|
|
fig.10.
click on to zoom |
|
|
|
|
|
|
|
|
fig.9.
click on to zoom |
|
|
|
fig.11.
click on to zoom |
|
|
|
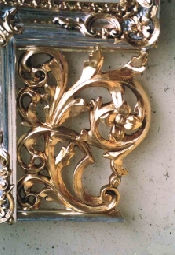
Bole
mixed with 5% rabbit skin glue was applied in 6 layers
and then gilding and silvering was performed by water
gilding technique. After 12 our gilded and silvered surfaces
were partially burnished.
Due to fact that this object will not be exposed to the
circumstances of everyday use, final protection was carried
out with prefabricated protection spray for luminous surfaces
(4) in order to prevent process of patination of silver.
Good feature of spray is anti static reaction so object
will be protected from dust accumulation (fig.12., fig.13.
& fig.14.).
Mounting
New elements
for mounting of the crown and side elements were made
of pinewood (Pinus nigra) and adhered oh the frame with
heat reactive synthetic glue (5). Crown and side elements
were placed on them and also adhered with heat reactive
synthetic glue (5). Reason for using heat reactive synthetic
glue was slightly curved profile of crown and side elements.
Feature of the glue is to accumulate between curve shape
areas and flat areas and to hold same characteristics
trough the time.
|
|
|
|
 |
|
 |
|
 |
|
|
fig.12.
click on to zoom |
|
fig.13.
click on to zoom
|
|
fig.14.
click on to zoom |
|
|
|
| List
of Used Prefabricated Materials
1. Nitro thinner: HB Body , Grece
2. Aliphatic resin glue: Titebond wood glue , Franklin
International, USA
3. Model plaster: Krone Hiliges Gipswerk, Germany
4. Protection spray for luminous surfaces: Kurt Vogelsand
GmbH, Germany
5. Heat reactive synthetic glue: Crown GmbH, Germany
Applied
Gold, Silver and Metal Leafs
Gold leafs:
Orange Doppel Gold, 22 Karat, Noris, Germany
Silver leafs: Blattssilber Normal, Noris, Germany
|
|
|
|
|
|
|